Wednesday, June 27, 2012

Do Hip Queens REALLY Wear Blue Jeans?

 Although I highly doubt hip queens do wear blue jeans, I used a Catrice polish by this name as the base of this mani. I'd had the color for a while, but really didn't understand why people were so excited over this polish back in the US. I swatched it on one nail (like you've seen demonstrated in a previous post) and was unimpressed.

The other day I got a wild hair up my @$$ and decided to use it on my toes. And I loved it. I NEVER match my toe and nail polish. Not ever. But I loved it so much on my feet that I figured I'd love it on my fingers. No sooner had I finished painting my nails than my fiance walked in the front door with 3 new polishes for me. I had asked him to pick me up a surprise from the grocery store expecting him to get chocolate, but instead he picked out polish. What a good man. :)


I left the blue base for a day and even wore it without topcoat (which I never do anymore since I met my BFF, Seche Vite) before attacking my nails with my new polishes.

All 3 polishes are from Catrice.

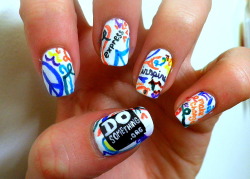
On my pinkies I used Just Married. On my index fingers I did a 2-toned gradient with Up in the Air and HQWBJ. On my middle fingers I did my first 3-toned gradient with HQWBJ, Up in the Air, and Be My Millionaire. Then I used Be My Millionaire on my pointer fingers. It's a pretty streaky silver, but I like it. For my thumb I did polka dots, larger ones in Up in the Air and smaller ones in Be My Millionaire, with a layer of a glittery Spoiled polish. It's a light blue jelly base with fine and small pieces of holo glitter, but the blue doesn't really translate to the nails, which is good for layering.
 

I was so impressed with Just Married that I eagerly took off these nails and painted each nail with a random color so I could see how Just Married looked over other colors. Unfortunately, they were pretty much all a let down. I tried light colors and darks, cremes, neons, and shimmers. Oh well.

This nail art was more about trying random things than actually having a plan in mind. But that's the thing that makes nail art better than say tatoos. ;) It's not really a good idea to try random tatoos, but random nail art is a-okay.

What do you think?

Monday, June 25, 2012

Neon Pink and Blue Wrapped Tips


I've been feeling uninspired again lately. Maybe Germany just isn't an inspiring place. lol. I loved how my white nails with the happy bright dots turned out so much that I decided to go with a mainly white base again. I didn't do nearly as good of a job with my cuticle lines this time though. Oh well. I'm practicing. :)

These looked a lot better in my head than they translated to the nails. I loved the color combination, but I had a heck of a time keeping my black lines all the same thickness. Maybe next time I won't drink a beer while doing my nails! :)


Any suggestions for me on how to keep my lines from getting out of control? :)

Sunday, June 24, 2012

Happy Easter (Bunnies)! In June!

Okay, so these bunnies are a day late and a dollar short, but I actually made a sort of tutorial for them. These were my Easter nails.


 I did a solid colored base and painted a white oval of sorts on my tips. 
 I then used a white striper to draw the outline of the ears. I used a combination of the striper and my regular white polish brush to fill in the ears.


The bunny on my green thumb was my favorite because I gave him a floppy ear.


 I went back in and used a dotting tool and black polish for the bunnies' eyes and a pink polish for the nose and inside the ears.


Do you like my quasi photo tutorial? :) I know I appreciate tutorials for nail art, but there are lots out there for bunnies.

Friday, June 15, 2012

Tennis Nail Art


The whole reason I met my man candy was because he played tennis. He went to our college on a full tennis scholarship and I went on a soccer scholarship. One fateful day our paths crossed and in 3 months we will be man and wife. Life sure has a way of messing with your plans. It's that saying, "Life is what happens when you're busy making plans." I always thought I'd marry an American (a Texan probably since that's where I grew up), and have my career established my now. Instead, here I am marrying a German and living in Germany. I'm not working yet and have never had a job in my degreed field. Oh life, you are a crazy bia.

Anyway, on to the nail art! My man's tennis team had a match a couple of weeks ago, so I decided to sport some nail art to support them. I did the logo and team name on my nails. I was relatively impressed with my little tennis player. I think he turned out the best of all my nails. The team name alternatively pissed me the hell off. My red striper got stringy so there were all of these incredibly thin stringy lines on the white background. I touched up what I could and put on the top coat. Only later did I realize that a black fuzz got under my topcoat. Rawr.


From left to right: a red tennis racquet and yellow tennis ball, a bouncing tennis ball in a field, a piece of a scoreboard, the net. 


I completely hated the racquet because the neck was too short and the strings weren't even going vertically and horizontally like a real racquet. I also hated that 2 nails are upside down. Oh well.

On my other hand I did the same net, bouncing ball, and (silver) racquet. I also had this grand idea to create a tennis court using my new striping tape. Unfortunately, it was completely lost in translation. i hated my brown "court" so much that I thought this orange shimmer jelly would help, but I neglected to remember it would turn the white lines orange too.


Oh well. I highly doubt the tennis guys noticed and my man candy was really appreciative of the gesture. :) That's a win in my book.

Monday, June 11, 2012

MSMD Monday! Happy Dots!

I have a love affair with my dotting tool.

There.

I said it.

It still amazes me how fun, pretty, happy, etc. a simple design done with a dotting tool can be. This is another perfect example. I've actually worn it for the last 5 days!

I used a design from http://lilgreenheart.blogspot.de/ for my inspiration.

Colourful dots 

These colors were so bright and cheery that I was really digging them last time I sat down to do my nails.

Of course I started getting the itch to see the design in different colors after I finished my left hand.


I stuck with the pink, blue and yellow color scheme for my left hand. It's funny how dark and flat the yellow dots look in this picture. On my hand, they are more of an electric orange-yellow!


Then I used a sort of orange (looks more red :/), purple, and a sort of green. I don't hate the colors together, but they certainly don't look the way they did in my head.


I just prefer pictures from this angle than the ones above. Do you have an affinity for one or the other?


I kind of chuckled to myself when I realized how much bigger my dots were on my right hand versus my left. I'm still working on controlling my left hand when I'm attempting nail art on my right hand.

What do you think? Is this something you would try for yourself?

Thursday, June 7, 2012

Say Hello to my Epic Failure!


These nails are a perfect example of a time when you have a good idea and a good tutorial, but things still don't turn out the way you hoped.

 
I LOVE The Nail Pro. Flat out love her. I've been into nail art for YEARS (over a decade by now), but her tumblr is the first nail art blog I discovered when I started googling ideas for nail art. I was instantly smitten. Unfortunately I couldn't remember her blog name for months after I moved to Germany, so when a fellow nail polish friend posted a link to one of her designs on Pinterest, I shrieked a little out of joy. This is one of her designs from back in April:


Unfortunately I can't blog this picture up any further without severely distorting the image, but you can check out her work here.

She did this art using sharpies and provided a youtube video on how she did it. It looked simple and I thought it'd be a nice way for me to do some more intricate designs since I don't have any nail art brushes yet. Unfortunately, my idea turned out HORRIBLY!


 My colors bled from the top coat and the red turned orange. So gross! I didn't bother with clean up because I prefer to let the mess wash away in the shower the next morning if I'm not going out the day I do my nails.


I was so disappointed with the sharpies that I decided to do simple "rainbow" tips on my other hand. I hated these too. They just weren't the right shades to go together.

Basically, I slept in these nails and promptly removed them early the next morning. We were going shopping for an engagement ring and I really didn't want to be showing off these nails to the sales associates in the jewelry stores.

Oh well. You can't win them all.

Argyle and Paisley Stamping with a Mini-tutorial

 Here is another example of my "technique" of a design on each hand. I used a base of CG Riveting (from the Hunger Games collection) that is just stunning. After I had put it on, I wished I hadn't because it covered up the gorgeousness of the base color. I used some of my Born Pretty plates for the stamping. The white I used is a stamping polish made my Essence. You can see I still need a lot of practice with the full nail designs. The argyle pattern is less forgiving than the floral/paisley-ish pattern.


 Try it with Carmella asked me if I had any instructions on stamping. I actually don't. Spellbinding Nails is pretty much the QUEEN of stamping nail art. Absolutely check her out if you want more information on it. My tips for stamping are to start out with the quality plates (Konad or Bundle Monster, although I don't have either), and not the fauxnad or Born Pretty plates (like I have). With those, you KNOW they are quality and that you will eventually be able to stamp with them. Some of my images flat out will not stamp no matter how many times I try. It's frustrating.
Any opaque polish will pretty much work for stamping. The Konad polishes obviously are the best option, but they can be pricy.


When you are ready to stamp, it's really just trial and error as far as equipment goes. I ditched the metal scraper that came with my stamping kit (from Essence) and started using an old plastic gift card. It works better I find. When I use the stamper, I usually use a rolling motion to pick up the stamp and to put it on my nail. I have very curved nails, so it works the best for me. If your nails are fairly flat, you could just push it straight down. You will have to experiment with pressure for the lifting of the image and transferring it to your nails. Some images work best with lots of pressure and some work better with little.

I hope that info can be of some use for someone! :)


Belated Memorial Day Nails

 I sure hope this post publishes correctly on the first try! :)

These were my nails for Memorial Day! I've kind of begun doing different color schemes on each hand. I wanted to do the half red/half blue with random white stars, but when I sat down to actually do them, I wasn't feeling it. On my left hand I did the red and blue base and then tried to freehand a row of stars along the seam with my smallest dotting tool. I really hated how it turned out, so I skipped a finger and tried doing them with a toothpick instead. I still didn't like how they came out, so I switched it up and just did simple white dots along the seam and topped it all off with a coat of CG Fairy Dust.


For my right hand, I decided to do a different version of American flags. If you've seen my very first post, then you've seen my usual American flag nails. I used regular scotch tape to create the white stripes over the red half and then freehanded the white "stars" with a dotting tool.


We were heading out to a birthday party that evening and I ran out of time to do the other 3 nails. Thankfully people are used to me having "weird" nails, so no one batted an eye. It was a party full of Germans who probably just thought it was an "American" thing, but they did compliment me on my nail art and my future mother-in-law told them how talented and artistic I am. It was nice to hear. :)

By the way, I haven't mentioned this before, but if there's ever a design you want a tutorial for or a specific color you're interested in, please feel free to ask. :) I love to help!